Specialty Templates

E-Prescribe and E-RX

AddThis Social Bookmark Button

 How To Use E-Prescribe in First Medical Suite


E-Prescribe allows a Doctor to write Prescriptions for Medications directly using the EMR.  This script writing function is done electronically and greatly increases accuracy and shortens the time it takes for a Patient to pick up their medicines.

You can access the E-Prescribe feature in First Medical Suite simply by clicking on large and easy-to-navigate buttons and tabs within encounter screens in the EMR software.  Medications can be historically documented in the Patient's chart under the Subjective Tab and under Medication.  At the time of the encounter, where the doctor determines what medications to prescribe,  a Physician clicks the Prescription link in the Tab Bar on the left side of the software.  A NewCrop E-Prescribe window screen will then appear.  NewCrop is the trusted ERX provider used industry-wide and makes it easy to write scripts and even research medications for Formulary verification, as well as any drug interactions.


With the E-Prescribe Feature you can:


Check and Verify Insurance before you prescribe the Medication

Get Alternatives if a drug is not approved by the Patient's insurance

Provide substitutions and Generic Options

Research Drugs by name

Read Detailed Drug warnings, use and other important information 

Read Warnings for over dosing as well as under dosing

Get Drug Interaction warnings based on Patient's Drug History


First Medical Suite records a full Medication history

Record and Document all medications a Patient has

Detailed Tables and Lists of all Prescriptions the Doctor has written for any patient

Pop Up windows and Warnings alerting the Physician of Allergic reactions

Pop Up windows to warn of Drug Interactions

Printable Patient Education Materials

Printable Drug and Manufacturer Descriptions and FDA Warnings and Usage


All local and major pharmacies now use E-Prescibe which means that almost any Patient can use almost any pharmacy to get the medications they need.  First Medical Suite makes it easy to order Medications and Drugs with one mouse click.  The EMR sends the script directly to the Patient's pharmacy of choice as listed in the Patient demographics screen.  The EMR also makes it easy to add or change pharmacies if a Patient moves or uses a new Pharmacy choice.  The script is sent and the Pharmacy fills the order.  The patient can pick up their Meds on their way home from the Practice.  All with a few mouse clicks.


Here are the Screens in First Medical Suite and how they are used in the EMR:


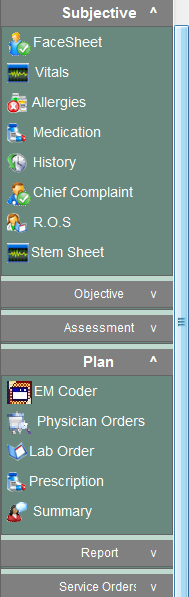
While in the Encounter - Select Prescription 

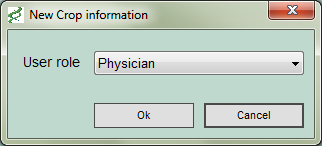
Each User has a role and certain permissions associated with that role.  No one except the Physicians and those Practitioners with licensure can prescribe medications or write scripts in the EMR.  So the EMR will display a box challenging a users ability to write a script.  First Medical Suite also has built in timeout timers that log off users when the software is unattended or left idle.  This insures a tight security and denies any entry in the EMR and certainly the Prescription area of the application.


The Compose RX Screen -  Here you search for Drugs and Medications by name and determine any allergy and Intolerances.

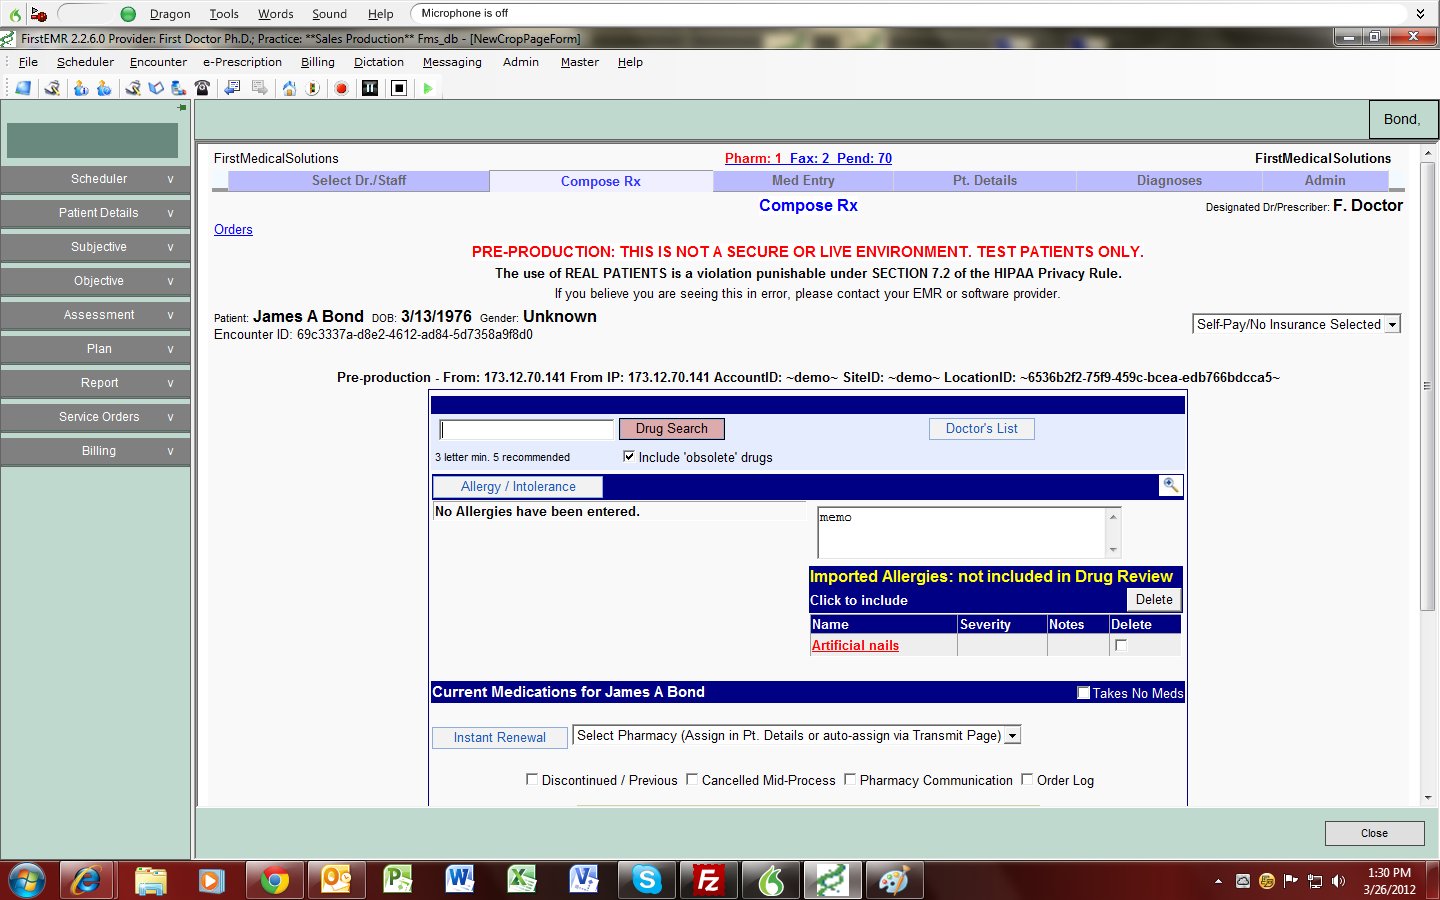
The preferred Pharmacy can also be selected easily using drop down boxes and lists.  Allergies are automatically imported. Renewals are simple and done with one button click.  First edical Suite helps you do your job as a Doctor quickly, securely and accurately.


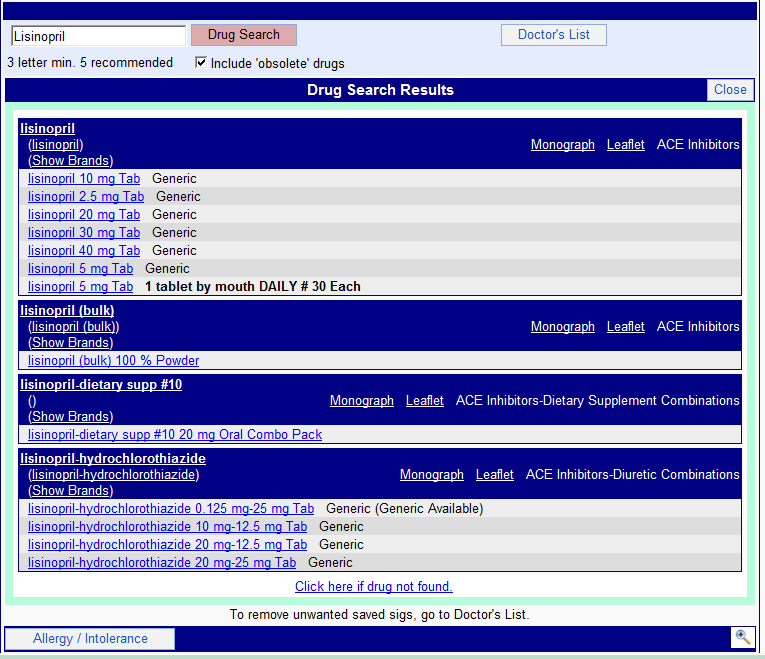
Drug Search Results with Information Leaflets

Type in the Medication and click the Drug Search button.  Instantly, you will have the brands, dosage and type of Medications that are available. Hot links allow you to select the Drug you want and the application allows you to add that choices or choices to the Patient's Prescription list.  All selections are compared against the Formulary and Insurance records for that Patient.  If a drug is not covered, the EMR will allow you to select and offer alternatives.

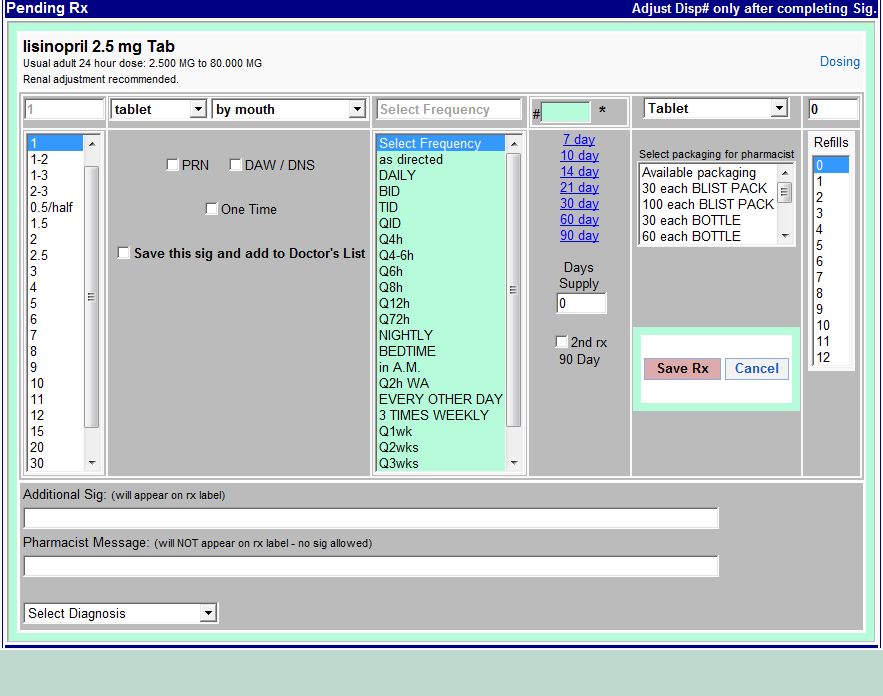
Get all the Information that you need about any drug.  After you make your selections, save them for future use by clicking the save RX button.  Save the Drug name, the details about the prescription and other choices specific to that patient.  The Medication will be saved in the Patient chart in the Medication History.


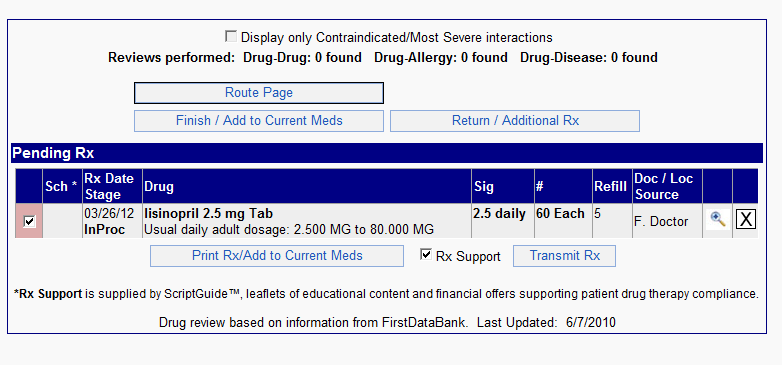
Print your Script or electronically Transmit the Prescription with a single button click.  You can also add additional Meds to the Patient's Prescription.  The EMR will fax the script to the Pharmacy of choice.  Simple and easy to navigate with clear screens and boxes. See and review all selections and choices prior to transmitting the order.


NewCrop E-Prescribe Information and Videos

Below you will find additional information from NewCrop in regard to their ERX interface.  Also see their instructional video series on YouTube for more help on using this powerful Prescription creation tool.


http://www.youtube.com/playlist?list=PLC2E55B597A88C7F9&feature=viewall


NewCrop E-Prescribe Help Document


It’s time to begin Electronic Prescribing!

By using eRx in First Medical Suite, you are taking the first step in enhancing your office’s prescription handling. You will find this process to be both intuitive and easy to use. However, we strongly recommend a full orientation period prior to beginning. At a minimum you should review the “How to Write A Prescription” summary available on the Administrative Page or use the Tour link at the bottom of each page for an audio orientation.  In order to help you navigate the system, each screen is described in great deal on the following pages. You will also find definitions for specific terms and fields that appear on the screens. We suggest that you review these pages prior to your eRx implementation.  Each help page has a summary and detail section. If you need just a quick overview of the page, the summary section might be all you require. If you desire a more detailed explanation, continue on to the detail section.


Do these instructions apply to you?

This eRx software in First Medical Suite EMR, has several different features available. If your system does not have all available features installed, you will read about features that might not pertain to you. In most cases, links to these optional features will not appear on your screen.  For example, our Partner users, who access this eRx system via one of our Partners, (EMR, PMS, etc.) may not need to login to the system and thus will not access a Login Page.  Alternatively, our Direct users must log in directly to the eRx system and require a Login Page.


There are other instances where users will have different functionality. All of our eRx users have the basic features of our Basic version which allows electronic prescribing along with RxHub™ medication history, eligibility and formulary.  Some users will have the Comprehensive option which includes patient-specific formulary information, drug/drug, allergy/drug and OTC/drug review along with patient leaflets. If you are using the Basic version only, the Comprehensive described in this document will not apply.


·        Example1: Most of our Partner Users add new patients directly into their First Medical Suite EMR software. Therefore they will not see the Add New Patient function in their eRx.  It will be in First Medical Suite under “New Patient”.


·        Example2: A Direct user chooses to use the Basic version and thus does not have drug-interaction information. Their screens will not display the link <Proceed to Review> for drug-interaction review.


If at any time if you wish to upgrade to another version, please contact your Account Manager.


Now it is time to provide you with some overall information:


General Tips That Might Help You


Connectivity. Our eRx system is Internet based.  Therefore, in order to use our product you must be connected to the Internet.  A high-speed connection (cable, DLS, etc) is necessary for efficient use.  (Dial-up will work, but it is slow for regular use.)  You will also need an Internet Web Browser installed on your computer.  We recommend Internet Explorer version 6.0 or higher.


Maximize your work space. Be sure to click on the single square on the upper right corner of your browser screen. The larger the screen, the easier it will be to read. Another tip you might try is to push the F11 key. This will remove some of your browser tool bars and will allow you more space on your screen. Pushing the F11 key again will restore your tool bars.


If you have a choice of screen orientation, use the longer “portrait” view. If you are purchasing a flat panel display, look for one that rotates. You might also want to consider purchasing a tablet pc which allows you to travel around the office and still be connected to the Internet. 


Saving information.  Any information that you enter on the screen will not be updated or recorded until you save the information by clicking the appropriate button.  The name of the button will vary from <Proceed> or <Save> etc, depending on the application. Clicking the appropriate button will then save your information. Alternatively, you may also use the tab key to move the cursor to any highlighted button and use the space bar to activate it.


Using the “back” button. Unlike “surfing” the Internet, the <Back> button will not take you to the previous screen. This is a safety measure: the “previous screen” may not show current patient information.  Instead, if you wish to revert back to a previous screen, use the navigation bar at the top of the screen or the buttons that say <Return to Prior Page>, <Cancel> etc.


Turn off Autocomplete.  This browser feature displays previously entered information while you are typing. New Crop’s search features work well with only the first 3 or 4 letters of a word, so Autocomplete is unnecessary and could be confusing. We suggest that you deactivate this feature by going to Internet Explorer and clicking Tools at the top.  Then click < Internet Options>, <Content>, <Personal Information>, <Autocomplete>.  Uncheck the box for “Forms.”


Turn off the Google Auto-Fill Function. While this function allows automatic entry of your own name and address on web sites, it can cause text fields on your ERx pages to appear yellow. In order to avoid any confusion, we suggest that you disable this Google feature while using ERx. To disable this function, click on the button on the Google taskbar which says “### Blocked”. You may restore the function after exiting ERx by clicking on the button which now states “pop-ups okay”.


Help.  ERx is designed to be simple and intuitive. In the event that you need it, there is a link to the Help Page at the bottom of each screen.  You have two types of help screens to choose from.  The Popup Help link displays the help screen in a separate screen for your review. Alternatively, you may choose the Helplink which will add the help information to the bottom of the screen you are working on. After reviewing the help information, you may close the screen by clicking on <Hide Help>. We want to be sure you have all of the information you need, so if the help screen did not provide you with enough information, then click the adjacent Comments/Questions to send an email to Customer Support. We’ll email you back.


Also, look for user tips to the right of the title bars.  An example of the Patient Education title bar is below.  Notice the italicized user tip located to the right.


Patient Education           Use Control key to multiselect, and add text as needed.” 


A complete listing of the Help pages is compiled in the Reference Manual, posted on the Admin Page.  Orientation videos are also posted on the Admin Page along with several screen shots.  Use thesupport@…. link at the bottom of the page for any remaining questions.


If you prefer an audio tour to reading, try the Tour starting on the Resource/Location Page before continuing on with this summary.  


Read Me First Pages. A good way to begin is to review the “read me first” pages (How to Write a Prescription). These pages are “screen shots” and will show you the major components of each screen and how they are used. You can access the “read me first” pages by clicking on <Administrative Functions> on the navigation bar and looking under the section titled “Support”.


Practicing.   Be sure to take the time to practice entering prescriptions before you “go live”. The easiest way to do that is to use the demonstration accounts that were preloaded on your system. The last names of the demonstration accounts all start with “zzz”.  Take the time to enter information into these accounts to learn how each screen works. If you need further directions, remember to click the <Help> link at the bottom of each page.


ERx Basic and Comprehensive.  Two versions of ERx are available which offer different features.  The Basic version is our base version which has the drug list, indexed healthplans, indexed pharmacies, RxHub and SureScripts.  The Comprehensive version adds automated allergy, drug and disease/condition review, herbals, and patient leaflets as well as managed care information which will identify which drugs reside on the patient’s insurance formulary. 


Summary

The Location and Resources Page

This page is seen at the start of each day after logging in, or by clicking the Resources link on the top left side of the page below the Navigation Bar.  Location / Workgroups reflects the workflow needed for prescription management within your practice.  NOTE:  for multiple Location/Workgroups, you will see all prescriptions written by all doctors within your practice from all locations.  Be sure and follow your office policy as to when to process an Rx from another location or doctor.  If locations are missing, contact your Account Manager.


Now that you are ready to e-prescribe you will begin on the Location and Resources Page. This page has several functions. You may use this page as a “quick” resource to find drug or formulary information. This page also displays Bulletin Board text. Additionally, this page allows the user to select the location where they will be working. Select your location or workgroup by clicking on it. If you do not see an approp

riate group or location, contact your account manager.


At all times, you will see prescriptions written by all doctors within your practice, regardless of location/workgroup.


Drug and Formulary Look-Up: The Drug function allows you quick access to drug information. Type at least the first 3 letters of the drug name, then click <Look up a drug> or use your Enter button. You will be directed to a screen which displays all drug names that fit your 3 letter criteria. The more letters you type in, the more specific your search results will be. Scroll down to find the appropriate drug. You will find the different dosage information following the drug name.


If you are using the Comprehensive option, clicking on Monographdisplays the complete information on side effects, dosing, etc. in a popup window. Likewise, clicking on Leaflet displays patient educational materials for printing. Select the appropriate language. If the drug information is not available in the specified language, the default language will be English. To return to the Location and Resources Page, click <Cancel/Close>.


If you have the Comprehensive option, you are able to check the Formulary for a specific insurance plan. First select the desired insurance plan from the dropdown box. Next enter at least the first 3 letters of the drug name and click on the <Look up a drug> button.  The popup screen will then indicate if this drug is “approved”, “non formulary”, “preferred”, “prior authorization required”, etc. for this insurance plan. To obtain further formulary information click on the coverage information link. (Example: If a drug displays a Non Formulary link, click on that link to find a drug which is covered. This functionality is used as a general reference only. All patient-specific formulary information will be obtained from the Compose Rx Page. Click <Cancel/Close> to return to the Location and Resource Page.


Account Manager’s News displays any information that the account manager wishes to post and can function as a daily “blog.”  The information listed here can be only entered or deleted by the Account Manager.


Rx News and Announcements displays any information that ERx wants to share or convey to its users.  New features and important updates are examples of the type of information you would find in this section.


Location / Workgroups divide an Account into smaller units. Your Account Manager has setup your Location/Workgroups to match the actual flow of prescriptions within your practice.  A Location/Workgroup need not have a different address- you may have multiple workgroups or locations within a single office location.


·        Example1: If you have several satellite offices, each satellite office might be considered a separate Location/Workgroup. Example:  Crestview OB/GYN has two satellite offices. Crestview West Side Clinic is one Location/Workgroup and Crestview East Side Clinic is the second Location/Workgroup.


·        Example2: Similarly, you may have more than one workgroup within a single location. If Crestview OB/GYN has one large office, they might have two separate areas where physicians see patients. Each handles their own prescriptions. In this case, Crestview Area 1 would be one Location/Workgroup and the other would be Crestview Area 2.


Although a nurse and a doctor might be assigned to different Location/Workgroups within the practice, they will see the other’s work at all times. A prescription written by any user, regardless of Location/Workgroup, will always be displayed in the patient record.  It is important to follow your specific office policy as to whether you are authorized to process prescriptions written by users in your or other Location/Workgroups.


On this Location/Workgroup page, click on the name of the Location/Workgroup where you are working. Some users will have only one Location/Workgroup listed, while others may have several. If your list is incomplete or inaccurate, contact your Account Manager. To return to this page at any time, you may click on your Location/Workgroup name in the upper left corner of your screen.


Your last login date and time can be found at the bottom of this screen.  When you reach this page, you should verify that the date/time stamp is correct.  If it is not, it may indicate unauthorized use of the system.  Contact your Account Manager about any discrepancies.


The Logout link is located in the upper left corner of the screen.  Click on this link when you are away from your computer for an extended period of time, or when you are done with your e-prescribing session.  Logging out will deny unauthorized users access to the system.

The Select Patient/Staff Page


Navigation Bar

Summary

The NavBar at the top of each page provides a quick way to change tasks/pages. Note, your name, the current user on the left and the current Designated Doctor/Prescriber, whose name will go at the top of the prescription, to the right. (Make a change on the Select Staff  (or Select Patient) Page. (A drop-down list for changing doctors also appears on the Compose Rx page.)   Pt Detail displays the selected patient’s address, insurance, etc and allows updating in some configurations. An insurance plan must be entered for formulary coverage information to appear with drug selections.  Note Medicare Part D should go in the first slot.  To the left, the RxHub/RxHistory may appear: click to view an all- doctor Rx history from the healthplan. Pt Notes enters information in the patient record. Pt. Dx displays the patient’s and doctor’s diagnosis list.  Admin has reports and other supporting functions.  (Direct users only: Select Staff is on the Select Patient page. Log out by clicking your name.)  Compose Rx displays the patient record and is where a new Rx is written.


Before explaining the main sections of this page, it is important to describe the Navigation Bar that appears at the top of the page. The Navigation Bar is made up of a series of labeled buttons or “tabs” used to move from page to page within the website. The Navigation Bar is common to most pages. Some users, having different responsibilities than others, might have different tabs on their Navigation Bar. In all cases, clicking on a tab will take you to the designated page. Use these tabs to navigate between pages. DO NOT use the <Back> or <Forward> keys.


The first tab, <Select Patient>, appears for Direct Users only. This tab allows the user to search for and select the correct patient. Before Direct Users can enter patient information or compose a prescription, they must first select a patient. (See Below for how to select a patient) Partner Users will see a tab which says <Select Staff> and allows the user to choose Staff.


The next tab, <Compose Rx> appears for any user whose category or role allows them to e-prescribe. (See the Status Page section below for further discussion of categories and roles.)


The <Pt. Details> tab is accessible to all users. Use this screen to add or edit patient demographics, insurance, contact information, etc.


The <Pt. Notes> section allows free-form notes for the patient to be entered. You may use this section to document course of treatment instructions, patient special requests etc. Previous or “Existing Note” will be displayed here.


The <Diagnoses> page allows the patient’s diagnoses to be searched and stored.


Finally, the <Administrative Functions> tab takes the user to a screen which allows reports and manuals to be printed, pharmacy information to be added, DOQ-IT information to be listed, etc. For more information on these pages, see the help screen for that particular page.


In addition to the tabs on the Navigation Bar there are links that navigate the user from screen to screen.  These links, like the Navigation Bar, are available throughout the pages.  In some cases, a doctor and/or patient must be selected before navigating to another page. In those instances, you will be prompted to enter the doctor and/or patient first.


The following is an overview of these links:


Directly above the Navigation Bar, in the center of the page, is the Status Bar.  The Status Bar is a link which reads ___Pharm: ___Fax:___Pend:___  and indicates the number of Assigned Rx/Messages for this account requiring review. The numeral indicates the quantity of pharmacy requests, faxes needing attention and prescriptions pending review. This information helps the user keep current with the Account’s workflow. By clicking on this link, the user is directed to the Status Page where these prescriptions may be reviewed and then redirected or acted upon. 


Directly below the tabs on the Navigation Bar to the left of the screen is Your Location/Workgroup Name.  In some instances, the name may be abbreviated.  Clicking on this link takes you back to the Select Location page where you may change your Location/Workgroup, logout, reset your password, review the bulletin boards, or use the quick drug reference tool. 


Your Login Namefollowed by the word (logout) appears as a link to the right of your Location/Workgroup link.   Click on this link to logout and complete your session, returning you to the Login page.  It is a good habit to click on this link when you are going to be away from your computer for an extended period of time or when you are done with your e-prescribing session.  Logging out will prevent unauthorized users from accessing the system.  If you have two different logins you may use this link to toggle between the two (For example: You have one Login as Account Manager and a separate Login as Doctor/Prescriber) .


To the far right of the Login Name is the Designated Doctor/Prescriber (person whose name will be listed at the top of the prescription). The name listed here will appear at the top of any prescription written. The Designated Doctor/Prescriber can be changed on the Compose Rx page or Med Entry page by selecting the name from the Drop Down box on the each of those screens.  Alternatively you may change the Designated Doctor/Prescriber from the Select Staff Page. (Select Patient Page for Direct Users) See information pertaining to the Select Patient/Staff below.


At times some or all of the following links will appear below the Navigation Bar depending upon the page you are viewing:


The <Progress Note> Link

This link appears on the Compose Rx page and provides a progress note to print and place in the patient’s chart. This note lists the patient’s known allergies as well as all current medications with the dosages and dates dispensed. Additionally, it affords the practitioner the ability to enter information such as height, weight, or chief complaint for this visit.


The < Face Sheet >allows you to display and optionally print a Face Sheet for the examining physician’s reference. This Face Sheet displays the medications that the patient is currently taking as well as allergies, patient demographics and diagnoses in a printable format.


The <Pt. Face Sheet> is intended to be given to the patient. It is identical to the Face Sheet however all medical terminology is replaced with terminology that a patient will more easily understand. Medical terms such as “bid, tid, and sig” have been removed and replaced with common terms such as “twice a day” etc.


To print the Progress Note, Face Sheet and/or Patient Face Sheet, click your browsers Print button to send this form to the network printer. 


The <Med Entry > Link

This link appears on the right side of the screen above the dropdown box containing the patient’s insurance.  Click on this link to go to the MedEntry/Refill page where you can enter previously prescribed medications into a patient’s record without writing a prescription. You may also enter medications prescribed for the patient by another physician.  A complete sig and dispense number are not required.  Any prescription information entered here will appear in the patient’s list of Current Medications. Additionally, prescriptions entered here can be entered into the queue for review and renewal.


Similarly, for any med school students, the MedEntry page goes to the Review page and back.  The med student can enter a patient’s meds and can "try out" an Rx by looking for interactions etc, but the student is unable to send the Rx.  A doctor then logs in and sends the Rx as appropriate.  To set up med students, enter them in the system as clerks just like you would enter any clerk user.


  • Example1:  A receptionist may enter medications into the patient’s record that a doctor outside of this practice has previously prescribed.


  • Example2:  A receptionist takes a phone call from a patient asking that the Doctor/Prescriber renew a prescription. That information is entered into the queue from this screen and is available for review and processing by an authorized prescriber.


The Patient’s Name and DOB (Date of Birth) are displayed on the left side of the page below the Navigation Bar. On some pages, the patient’s insurance plan will be displayed on the right side of the screen. If the patient has more than one plan, the drop down box will permit you to scroll through the list of this patient’s plans. You may use the drop down box to select the particular plan which applies to a prescription. (Comprehensive users only)


RxHub™ is an on-line managed care information source.  If the patient is a designated RxHub™ patient, current eligibility will be displayed directly below the patient’s name along with an RxHistory/RxHub link.  Click the check box to view the patient’s eligibility.  Click the Rx History/RxHub link to view this patient’s all-doctor prescription history as provided by the patient’s healthplan.  Confirmation of physician status and selection of a time span is needed first.   If the patient is not an RxHub™ patient, these links will not appear.


Doctor / Mid-Level / Staff Selection

All users must ensure that a Designated Doctor/Prescriber’s name is selected from the drop down box as a Designated Doctor/Prescriber must always be selected before any prescription can be written.  Both are always selected on this page.  Click on the dropdown box to make your selection if the displayed name is incorrect.  The nurse or doctor you select will stay in place until changed by you. The doctor/prescriber can also be changed on the Compose Rx or Med Entry / Refill Pages.  Physicians who log in will be unable to change the doctor’s name. Similarly, staff members are unable to change the staff name. Return to this page to make a different selection as needed. Only doctors for this location are listed.  Contact your account manager for missing names or incorrect information. 


If you want more information, Doctor/Prescriber, Midlevel and Staff are further explained below:


The Doctor/Prescriber is authorized to submit prescriptions to a pharmacy under his/her own name.(Example: DDS, DO, MD, PA).  They are the only individuals whose name may appear at the top of a prescription. This could be the name of a physician, but it could also be the name of a PA or NP, if allowed under your State statutes. When a user transmits a prescription, they must choose a Designated Doctor/Prescriber from this list.


The Mid-Level Practitioner (NP, APRN, PharmD, etc) is authorized to sign a prescription and submit prescriptions to a pharmacy under the supervision of a Doctor/Prescriber. The Mid-Level Practitioner user can write or renew prescriptions, although the Mid-Level Practitioner user cannot have their name listed at the top of a prescription.


The Staff Category is split into 3 roles.

·        The Clinical Staff role, typically a nurse or medical assistant,may access the same pages and func

tions as Doctor/Prescribers and can call a prescription into the pharmacy however Clinical Staff cannot sign a prescription.


o       Example1: An office nurse receives a request from a patient to renew a prescription. The office nurse, in accordance with office policy, may then transmit the prescription with the Designated Doctor/Prescriber listed as authorizing physician.


o       Example2: A doctor asks his Medical Assistant to call an Rx in for a patient.  The MA then enters the prescription into the system, listing the requesting physician as the Designated Doctor/Prescriber.


·        Clerical/Admin Staff are not authorized to call a prescription to the pharmacy.  However, within ERx, Clerical/Admin staff may enter renewal requests into the queue for Doctor/Prescribers, Mid-Level users or Clinical Staff to review and/or authorize. Clerical/Admin Staff can also enter and edit patient’s information as well as print Face Sheets.


o       Example: A receptionist receives a phone call from a patient requesting a prescription renewal. In accordance with office policy, the receptionist may enter the renewal request into the queue for a Doctor/Prescriber, Mid-Level Practitioner or Clinical Staff to address via the Med Entry/Refill page.


·        Full Access Staff are granted the same capabilities as the Account Manager.  This allows more than one user to share password maintenance and other chores.


Patient Selection  Only Direct users will have the ability to select a patient on this page. Partner users select their patients prior to entering the eRx program and thus will not see this section on their page.


It is important to avoid duplicate patients. For that reason you must first verify that the patient is not a current patient by using the Search function.  On this page you will select a patient using one of several criteria:


To search by name, enter at least three letters of the last name. Entering a first name only will cause an error message to be displayed.  Add a few letters of the first name in addition to the last name for common names (i.e. if searching Smith or Garcia, gives too many results.)


To search by number, enter at least 2 characters of the Medical Record Number (MRN), 3 digits of the Social Security Number (SSN with or without dashes), or 3 digits of the phone number (with or without dashes).  Note: only the MRN requires exact entry of any dashes, spaces, etc.  In the event that the patient you are seeking does not appear, try searching with a different identifier. 


Once you have entered your search criteria, click <Search> to display the results. All matching names will be displayed as links. In many instances your search may result in more than one patient with the same name. You may verify your selection by noting the DOB (Date of Birth), SSN (Social Security number) and phone number that are displayed.  If the desired patient is displayed, click on his/her name. In the event that the patient you are seeking does not appear, try searching with a different identifier such as SSN or MRN


If you are sure the patient is not already in the database and no patient is found matching the selection criteria, use the Click here to add a patientlink that appears below the search results or go to the Admin Page and click on Add/Maintain Patient

You may also want to check with your account manager.  Clicking the patient search button without entering any information will open the search box with the last 20 patients selected for this location.  


When you have located the desired patient, click on the patient’s name. You will then be taken to the Compose Rx Page.  If this does not happen automatically, click <Compose Rx> on the Navigation Bar.


Patient Search Results: Displays the last twenty (20) patients selected for your location.  If you do not see the patient you are looking for on this list, use the Patient Search to locate the patient.


Office Bulletin Board: The bulletin board may be used to informally display messages to all staff throughout the day. Type any message that you wish to send and click the <Save> button. To erase a message, highlight the text and choose the delete key on your keyboard. Click <Save>.


The Status Page


Summary

The Status link, above the NavBar, takes you to the Status Pag where all the prescriptions needing further processing are listed.  Click the status link to go to the Status Page.  Pharmcom = electronic pharmacy renewal requests.  Faxes Needing Attention = those that did not transmit correctly. Failed Electronic Rx will also be listed and require processing.  Pending = Rx that have not been completely processed.  Pending Rx can be one of 3 stages.  DR has been assigned by staff for a doctor to review.  NS, has been reviewed and approved by a doctor but still needs staff to send to a pharmacy.  InProc, incompletely processed, has been assigned un-reviewed or left unfinished or forgotten by the displayed user. 


Any prescriptions left on the Status Page at the end of the day represent “unfinished business”.


Note to Partner regarding access to a Patient: For some accounts, only the selected patient from the EMR [active patient on your side] is available for processing on the Status page.  Users are unable to change patients on the Status page.  The user must return to the Partner’s application to select another patient and then return to the Status page to continue processing. Exceptions to this are re-faxing and NS status prescriptions; both of which are already part of Current Meds.  (Direct users are able to access and process all).


The Status Bar appears at the top of all pages. The link displays 3 items. The first isPharmor pharmacy. The number listed here is the number of pharmacy communications requiring attention for the entire Account. These are either refill requests or messages from SureScripts pharmacies. Clicking on <Pharm> will take you to the Status page where you can view the transactions.


The next link is Fax. The number after the word Fax is the number of faxes which were not successfully transmitted. Possible causes for their being on this list include wrong fax numbers or a malfunction at the pharmacy. Clicking on <Fax> takes you to the Status page where you can view the transactions. Once the fax has been successfully transmitted, it will be removed from this list.


ThePendinglink displays the number of incomplete or pending prescriptions for your Account.  Clicking on <Pending> takes you to the Status page where you have the ability to view all transactions requiring your attention. 


Although all transactions for your Account are listed on the Status Page, those which need attention from your Location/Workgroup are bolded. Any transaction listed here, however, can be accessed for pr

ocessing.  Be sure to follow your office policy on handling prescriptions written in a different Location/Workgroup.


TheStatus Pageis split into five sections:


(1) The Pharmacy Renewal Requests section lists all messages and refill requests received from the SureScripts pharmacies. The request lists the patient name, date of birth, date received, drug name, Doctor/Prescriber, Location/Workgroup and pharmacy. Clicking on the Patient Name takes you to the PharmCom page which displays the message in detail. From this screen you may deny the refill, or continue on to approve or respond to the pharmacy message.


(2) The Failed Electronic New Prescription:  Needs Reprocessing section lists electronic prescriptions which were not successfully transmitted.  The Patient Name, date the Rx was created, drug, Doctor/Prescriber and user are listed.  You may click on the patient name to take you to the RxDetail screen where you will see the prescription details and can retransmit the prescription.  This particular section title bar will not appear on the Status Page unless there are electronic prescriptions that have failed.


(3) The Failed Fax Transmission:  Needs Reprocessing section lists any fax which was not successfully transmitted. Faxes listed in this section have not been transmitted. The Patient Name, date of fax, drug, Doctor/Prescriber and Location/Workgroup are listed.  You may click on the patient name to take you to the RxDetail screen where you will see the prescription details as well as the transmission information. From the RxDetail screen you may reprint or retransmit the entire batch of prescriptions (if applicable) or just an individual Rx.  If you are forwarding this prescription for another user’s review, you may add an explanatory note at this time.  Additionally, you may add patient education notes to the prescription which display on the Patient Face Sheet.  To return to the Status Page, click on the Close/Return to previous page link.


(4) The Staff Processing List indicates prescriptions which are pending further review. Those prescriptions that are listed in bold type represent items that were entered at this Location/Workgroup. If a transaction is not listed in bold type (thus originating from another Location/Workgroup), it can still be processed if permitted under your specific office policy.


Pending prescriptions can be of three types: NS, InProc or DR.  NS (Needs Staffing attention) have been approved by the Doctor/Prescriber and are waiting further processing from Staff. If, for example, a Doctor/Prescriber approves a prescription and elects to wait and have his staff transmit it, it would be listed as NS.  Selection of this patient listing will take the user to the Route Page for printing or transmitting to a pharmacy.  InProc (in process) prescriptions are those which are left unfinished at any point in the Rx process. Selection of this transaction takes the user to the Compose Page for completion or deletions.  DR (awaiting Doctor/Prescriber Review) indicates that a user has determined the prescription requires a Doctor/Prescriber’s review.


 (5) The Doctor Review Listshows prescriptions that have been set aside by the Mid-Level, Staff or other Doctor/Prescribers for this Doctor/Prescriber’s review as well as incomplete rx (InProc.)   The prescriptions are designated DR.  Prescriptions left incomplete after review by this Doctor/Prescriber will be returned to the patient’s pending list and designated InProc.  Selecting that Rx will take the user to the Compose Rx Page.  


Note to Partner regarding access to a Patient: For some accounts, only the selected patient from the EMR [active patient on your side] is available for processing on the Status page.  Users are unable to change patients on the Status page.  The user must return to the Partner’s application to select another patient and then return to the Status page to continue processing. Exceptions to this are re-faxing and NS status prescriptions; both of which are already part of Current Meds.  (Direct users are able to access and process all).

The Compose Rx Page


Summary

Displaying the patient’s Current Medications and any Pending Prescriptions, this page is the center of the prescribing process.  Mid-page, note Allergies to drugs, foods, etc.  There is a Memos section as well as a drop-down that allows you to change the  Designated Doctor/Prescriber which is handy for nurses processing multiple doctor’s refills.  


Start the prescribing process by looking up a drug.  Type 3 or more letters and click <Drug Search/List>  or use the Enter key.  Select the desired formulation that then appears above as Pending where the sig can be added.  To add the sig, click Edit.   Note the check box at the bottom of the Edit box.  Checking this box adds the entire Rx to the Doctor’s Drug/Rx List for future reuse.  However, drugs are automatically added to the Doctor’s List as they are selected.  To view the Doctor’s Drug list, leave the Search box blank and click <Drug Search/List>.  Drugs can also be added or subtracted from lists by using the check boxes which appear to the right of each drug search result.  Multiple Current Medications can also be selected for renewal by checking the boxes to the left of each current med that is listed.    All newly selected drugs will appear at the top of the page as Pending Prescriptions.   The Instant Renewal button in the Current Medications section of the page allows sending a batch of renewals directly to the patient’s pharmacy.


Pending Prescriptions are part-way through the process but have not yet been added to the patient’s Current Medication list.  Any incomplete Rx are highlighted (for example, an incomplete or missing sig). In addition to those newly selected, you will also see 1) Rx left at any point in the process, Stage = InProc.   2) Rx left by Clinical Staff for doctor review = DR.    An Rx that has been approved by the doctor, left for staff processing, but has not yet been printed or sent to a pharmacy is staged NS and is highlighted.  You can click on the drug to change the strength or click on the formulary status to view the drug alternatives.


Rx may also appear in a box above the Pending section when information for full processing is not available.  The drugs listed in his section are not used for drug review!  Convert these to a Current Med by clicking and selecting from the search results.


To complete an Rx, click  Editif the Sig box is not already open.   Select number, sig, and adjust the directions or pre-calculated 30-day supply as needed.  Check PRN or DAW (dispense as written). Check “90 days” to generate a 3 month Rx in addition to the original Rx you are writing.  Enter any additional sig such as insulin dosing for the Rx label.    (Pharmacy data standards allow only digits  in the Disp# field.    Therefore, for dose-packs, tubes, insulin etc, click Packaging and select for the pharmacist.   Place the number of packages in the Dispense # field as the last step..)     Add any additional directions for the pharmacist.  Open the Diagnosis list and select for this Rx if desired.  Save your changes by clicking <Save>.  Change your mind for the sig by clicking Undo.  Use the Xto delete the entire Rx.  Finally, click <Proceed to Review>.  All Rx must be complete before proceeding. 


The Dosing feature is accessed via the Edit option on the Compose Page.  Once in edit view, you can access the dosing by clicking on the dosing link which displays below the drug name.  Several indications will display.  Select the desired indication and you will be presented with the dosing calculations based on the patient’s age and weight.  The dosing calculates for pediatrics so make sure to enter or adjust the weight as needed. 


Current Medications can have multiple Sources. (1) prescriptions written by all doctors within your account are displayed with the Location. (Your current Location is bolded.) (2) medications entered by staff from the Med Entry page or (3) additional prescription records that may have been loaded from outside sources such as RxHub, RHIO, or IPA.  Click Edit  within the Current Meds to record a sig change.  To discontinue a drug or eliminate duplicate records, use the check boxes and <D/C>.    At the bottom of the page are links accessing additional lists:  previously Discontinued MedicationsPrescriptions Cancelled after leaving the Compose Page, and a log of the patient’s Pharmcom activity, including denied renewals.    The tan shading / tinting behind meds on the Current Meds list indicates that these medications are from an external source.  Examples of external sources include meds imported from RxHub and meds entered on the MedEntry page that were prescribed by doctors outside of your account.


Additional features on the Compose Rx Page:  Use the MedEntrylink to (a) add a drug to Current Medications for a new patient or when prescribed by a doctor outside your practice (an External source), with any doctor’s name/ start date or (b) leave an Rx for Clinical Staff or Doctors for later review and processing.  To the left, the Progress Note and Face Sheet links each generate a Current Meds list in a printable format.  Patient Version substitutes “

twice a day” for “bid” and displays Patient Education materials.  (See Rx Detail, below)   These features can also be accessed by clerical staff from the Admin Page.


The Compose Rx Page is the center of the eRx prescribing system, as each new prescription begins here.


Pending Prescriptions

Beginning at the top of the page, you will note all pending prescriptions for this patient.  These prescriptions have not yet been added to the patient’s Current Meds list and as indicated on the Status Page, each is coded with an NS, DR, or InProc (denoting Needs Staffing, Doctor Review, or In Process, respectively). These Rxs are not yet part of the permanent record but are included in drug interaction checking on the Review page. 


If your Account has the Comprehensive functionality, you will see the Formulary status. You can click on the formulary status to display the drug alternatives.  This is especially useful if the drug is non-formulary and you want to select a drug that is on formulary.  You can also click on the drug name to change the strength if you need to do that.  You will also see an Edit link associated with each pending prescriptionClicking on this link expands the fields to allow you to make changes to the prescription. A click on the magnifying glass icon takes you to the Rx Detail page which provides complete information on the prescription, including any additional directions, prescription batch and previous pharmacy transmission information.  You also are able to add notes for both the patient and for other users to reference.


To delete a pending prescription, click on the “X” to the right of the prescription you want removed.


The Dosing feature is also accessed via the Edit link of Pending prescriptions.  Once in edit view, you can access “dosing” by clicking on the dosing link which displays below the drug name.  Several Diagnoses / indications will display.  Select the desired indication and you will be presented with the dosing calculations based on the patient’s age and weight. 

o       The dosing calculates for pediatrics so make sure to enter or adjust the weight as needed and click the <Update weight in Kilograms> button. 

o       If you want to calculate the dosing based upon a different frequency (ie, BID in instead of Daily) select a different frequency from the drop down box. 

o       Similarly, if you decide you want a different strength (i.e., 500mg instead of 250 mg) than what you originally selected you can select the new strength from the box of that displays the various strengths.

Scrolling down will allow you to view the prescription that you are editing.  You can make any changes as necessary and then click <Save> and you will be taken back to the Compose Rx page.


Drug Review

If your Account provides the functionality, you will notice a <Proceed to Review> button.  This Drug Review process will notify you of any possible drug-drug, drug-allergy, or drug-OTC interactions.  All new prescriptions will be added to the Pending Rx section as InProc and will remain there until reviewed for interactions (if your account has that functionality) or printed/transmitted.


Adding a New Prescription

The area below Pending Rx labeled Drug Search/List is where you start to add a new prescription.


A new prescription can be generated several ways when it comes to finding and selecting the drug:


(1)         If the prescription is one that is commonly used by the Doctor/Prescriber, leave the search field empty and click on <Drug Search/List> first. This action brings up the Doctor/Prescriber’s drug list which is automatically built by storing the names of the drugs the physician has prescribed.  From here you may select the appropriate drug if it is displayed.  To select a single drug, click on the drug name which appears in blue underlined font.  To choose more than one drug, click the check box(es) to the left of the drug name. 


Drugs are automatically added to the Doctor/Prescriber’s favorites list when they are prescribed.  To remove drugs from the Doctor/Prescriber’s favorites list, click on the <Drug Search/List> icon to display the doctor’s favorites list and then proceed to check the appropriate box(es) [to the right of the prescription line] of those drugs you would like removed from the doctor’s favorites list and click <Remove>


(2)         If a new prescription is not already on the Doctor/Prescribers Favorite List, type at least the first 3 characters of a brand or generic name into the search text box (You may also expand your search by clicking the Include Obsolete Drugs check box to add any withdrawn drugs to the list)and click <Drug Search/ List>  This action brings up the list of drugs that match your search query. The more letters you enter, the closer the search will be.  With the drug’s name you will find a description of the drug along with Monograph and Leaflet links. The Monograph link, when clicked, displays the drug Monograph on a separate page.  Similarly, the Leaflet link displays the drug information in a format for patients.  You are able to print a leaflet for the patient when you print/transmit the prescription. 


(3)         Another way to start a prescription is to select a prescription from the patient’s Current or Previous medications list.  You can do this by clicking on the check box to the left of aCurrent or Previous prescription, and then click the <Select> button.  This moves all checked drugs to the Pending Rx area along with the appropriate sig, dispense number and directions.


If your Account has Formulary functionality you will note that the patient’s health plan formulary information is listed in the search results to the left of the drug name and dosage. NOTE: for formulary to work correctly, the patient’s insurance must be displayed in the upper right corner of the screen below the Navigation Bar. If you have Formulary coverage and the appropriate health plan does not appear, either click the insurance dropdown list on this page to see if the patient has other insurances listed or go to the Pt Details Page and select the patient’s insurance/formulary from the drop-down list.  (Contact your account manager if your desired health plan is not listed).  If there is no insurance displayed at all, you will need to go to the Pt Details Page to select it.


If the Formulary states Not in Formulary then the patient’s insurer has not placed this drug on its Formulary. At this point, you may click the Not in Formulary link to bring up a new window which lists the equivalent drugs that are approved and should be considered instead. At your discretion, a drug that is listed as Not in Formulary may still be selected.


If an Rx is covered on the Formulary the Covered link will appear. Clicking this link provides the Preferred/Approved status. If Generic Available appears, click the ingredient name (displayed in parentheses to the left of the Monographlink) to display all formulations. If searched by ingredient and no generic is available, the brand name appears in parentheses.


When all drugs and proper dosages have been selected, regardless of which of the methods above you used to find the drug(s), click on the <Select> button to add the prescription to the pending Rx section.


From the Pending Rx section, enter the Sig and Dosage information from the drop down boxes. Click PRN (as needed) and DAW(Dispense as written) where applicable. The Disp# (number dispensed) will calculate and display a 30 day supply. You may overwrite that number at this time if you choose. Use the Select Packaging dropdown to display information on sizes of tubes, liquids, tablets

per bottle, etc.


NOTE: The pharmacy data standards allow only digits in the Disp# field; therefore, for dose packs, tubes, insulin, etc., click packaging and select for the pharmacist, then place the number of packages in the Dispense # field as the last step.


For purposes of CCHIT compliance, the ability to denote an Rx as Short Term or ‘One Time’ has been added as a check box within the EDIT view of the Pending Medications and Current Medications.  Checking this box causes "one time" to be displayed in the SIG display.


Selecting the 90 Day box generates a 3 month Rx.  Any additional information that you wish the patient to have on the label should be entered in the Additional Sig box. Any pertinent information for the Pharmacist should be entered in the Pharmacist Message box. You may also select a diagnosis from the patient’s record in the Select Diagnosis box. Clicking Add to Doctor’s Drug/Rx List incorporates this drug and dosage on the Doctor/Prescriber’s Favorite list. When completed, click <Save> or click <Undo> to return and not save changes.


Note on Medical Rx Terminology

qd = daily

bid = twice a day

tid = three times a day

qid = four times a day

q4h, 6h, etc = ever 4 hours, 6 hours, etc.

HS = bedtime

q a.m., p.m = daily in the morning, evening

qod = every other day

prn = as needed

DAW = dispense as written (do not substitute)


Imported Rx

If Rx are imported from another system they will be listed in their own imported Rx category.  If they are imported without adequate information for full processing, they will be labeled: .Note, these Rx are not included in drug review.  To replace with an Rx on the Current Meds List, click the drug name and proceed. Delete the Imported Rx as desired. Some Imported Rx may have enough information to be included in drug interaction review and thus  will not have the warning label.  Any Rxs imported into Current Meds are considered to be from an External Source and will have a tan background.  Examples of External Sources include meds imported from RxHub and meds entered on the MedEntry page that were written by doctors outside of the account.


Change Designated Doctor /Prescriber

To the right of the Drug / Search List is the Change Designated Doctor / Prescriber  area which displays the selection box for the Doctor/Prescriber authorizing the Rx.  Click to change if necessary. 


Patient Allergies / Intolerances / Notes

Below the Drug Search / List box the allergy and the memo boxes are displayed. To add or delete allergies for this patient, click the <Allergy / Intolerance Search> button. The allergy / intolerance Search box will display with a blue border along with a list of common allergies / intolerances.  At this time you can either search for new allergies to enter, delete previously entered information or search and click on No known allergy when appropriate. 


Search for an allergy by entering all or part of a brand, ingredient, drug category or non drug item in the box and click <Search for Allergy>  The results display below the <Search for Allergy> button.  Select the appropriate allergy by clicking on it.  Use the “click here to add a non-drug allergy if not found” feature to add non-drug items.  This feature allows you to type in the non drug allergy.  After doing so, click the <Add Non-Drug Allergy> button.


Whether you added the allergy by sea

rching and selecting it or by typing it in as text, the  next step is to indicate a severity or type in comments specific to this allergy.  Use the  Select Severity drop down box to assign a severity to the allergy.  Severity is not a required step.  If you do not know the severity of the allergic reaction you are still able to enter comments into the text box that displays and then click <Save Allergy> or <Save / Add Additional Allergy> to add the allergy to the patient’s list.  Or, you can use the <Close> button to close out of the Allergy / Intolerance Search box. 


The magnifying glass on the right hand side of the Allergy / Intolerance Search title bar allows you to view the Allergy Maintenance Log.  This log displays the user, what they did (add, view, etc) with each allergy, the date the allergy was viewed, added or modified, the severity and any notes that were entered.  To close out of the Maintenance Log, simply click the <Close> button located on the right hand side of the Allergy Maintenance Log title bar.


To delete an allergy that was previously entered, click on a specific allergy.  This will open the Allergy Detail box which allows you to modify or delete the allergy.  To delete it, simply click the  <Delete this Allergy> button.  Use the <Save Allergy> button after making changes or modifications to the severity and/or additional info.   The deletions and modifications will appear in the Maintenance Log for future reference.


The allergy field is not required and can be updated at any time by returning to the Compose Rx page and entering the allergy information.


Current Medications

Current Medications prescribed or modified for this patient by all physicians on your account are listed below the Patient Allergies / Notes area at the bottom of the page. Each medication is listed along with the date, drug name, SIG, number dispensed (#), number of refills (Ref), Doctor/Prescriber’s name and Location/Workgroup.  (An asterisk (*) after the word SIG indicates there has been a change in the Sig). 


Also available to the right of each prescription is an Edit link and a magnifying glass icon.  Both of these features were described above in the Pending Rx section.  The Edit button allows you to alter the Sig and Directions after a prescription has been added to the Current Medication list, if a patient has been instructed to take a medication differently than originally prescribed. After you have made the changes reflecting the new prescription instructions, click the <Save> button to save the Sig modifications.  Changes are recorded on the Detail RX along with the authorizing doctor and user.  Remember, an altered sig displays an asterisk (*). 


The <D/C> button is used to discontinue current medications.  Discontinuing a current medication moves it to the Previous Medications list.  To discontinue a current medication, select the check box to the right of the magnifying glass icon and then click the <D/C> button. 


To renew one or more of the current medications click on the check box(es) to the left of each medication you want to renew.  Then click the <Select> button.  This moves all the selected prescriptions to the Pending Rx section for further processing / transmission. 


The Drug Review link, when clicked, performs a drug review of all the patient’s current medications.


The <Instant Renewal> button allows you to simply select all the drugs you wish to renew, select the appropriate pharmacy and click <Instant Renewal>.  This process will send the selected prescriptions to the chosen pharmacy and move the original prescription to Previous Medications. (If no pharmacy is selected, or a prescription is incomplete, it will move to Pending Rx instead.) The selected prescriptions will then be listed at the top of the Current Medication list

 <o:

p>

Finally, at the bottom of this page are selection boxes to view additional rx flow detail.  With all of the selection boxes, checking the box will display the items.


(1)   “Discontinued/ Previous Medications”   When selected, all previously dispensed medications are displayed under the Current Medications list.  By using the Previous Medications list the physician has the ability to review the patient’s total prescription history. 


The <Move to Current Medications> button which appears within the Previous Medications area allows you to move a medication to the Current Medication list by selecting the box to the right of the medication and clicking the <Move to Current Medications> button.


(2)   “Cancelled Mid-Process” shows any medication that has been deleted with the X icon prior to being added to Current Meds.


(3)   “Pharmacy Communications” show all PharmCom / Surescripts transactions.  Denials will only appear here and on the Pharmcom report on the Admin Page.


(4)   “Order Log” shows these manually written items that are not put on the Current Meds list.  Ie. “wheelchair”    When writing an “order,” the user can choose to put the item in either location.


(5)   “Denied” shows these items only when an advanced feature, “Accept/Send” is in use.   This feature allows, ie., a nurse to assign an rx to a doctor.  This rx cannot be cancelled or deleted.  It can only be denied.  


RxNorm


RxNorm is a drug index, an alternative to First Data Bank.  If you are reading this via the link on the prescribing pages, your system is utilizing RxNorm.   If you are reading it as part of the Reference Manual, it may not apply as many accounts do not utilize RxNorm.   (To see which you have, look at the bottom of the Review Page.)


RxNorm was created by the National Library of Medicine.  The goal was to supply a drug list meant for electronic prescribing that was available free-of-charge.  Several high-quality drug lists already exist:  First Data Bank, Multum, Gold Standard, etc.   However, the licensing cost from each supplier was seen as an impediment to large-scale implementation of erx.


A second goal was to supply a cross-walk between all proprietary indexes: a “metathesaurus.”   This would allow a patient’s drug history to be easily converted to alternate drug indexes, important for interoperability.


RxNorm does deliver these goals to varying degrees, however, it remains a work-in-progress as recognized flaws continue to be addressed.  The primary problem is that the mapping from one index to another is not fully quality-controlled by RxNorm.  Each provider of proprietary indexes supplies QA to varying extents.  You are using a First Data Bank version, quality-controlled by NewCrop.


RxNorm is a drug index only.  It does not have clinical content such as drug interactions and allergies.  Within NewCrop, this content is supplied by First Data Bank.   If you have a Comprehensive version of our software, you are seeing this. 


A deficiency of RxNorm is that some drugs cannot be mapped to First Data Bank.  These are labeled “Unreviewed RxNorm. ”  Since they cannot be reviewed for drug interactions or allergy, they appear in a so-labeled box on the Review page. 


Drugs are unreviewable for several reasons.  1) They may be Canadian, and, thus, not part of First Data Bank.   Only current FDA approved drugs are listed by FDB.   For instance, Crestor is marketed in a 2.5 mg tablet in Canada only.   2) Compound drugs are not completely indexed.   Thus, for instance, some oral contraceptives will be shown as Unindexed.  3) Over-the-Counter drugs are not always included in FDB, although most are.  These, too, may appear as “unreviewed.”


As stated, RxNorm is a work in progress.  We anticipate ongoing improvement and changes.   Look for a category of “Canada Only” in the near future.    Please send along your suggestions:  This e-mail address is being protected from spambots. You need JavaScript enabled to view it.    


For more information,  http://www.nlm.nih.gov/research/umls/rxnorm/


The Review Page


Summary

Interactions and allergies comparing the Pending Prescriptions to the patients Current Medications and each other, are displayed.  If this is an RxHub patient, drug interactions are automatically checked against a 120 day all doctor history as well as Pending and Current Medications, if your account has this feature. The Drug/Condition check is activated when the Dx or pregnancy indicator is passed from the EMR or PM system. (Direct users: enter a Pt Dx via the Nav Bar)  Choose the next step from the buttons at the bottom to determine the fate of the selected Rx(s).    Uncheck a box to split the batch as needed.


<Approve/Leave for Staff> allows doctors to add the batch to the staff list on the Status Page as an NS.   Nurses may select <Leave for Doctor Review>, changing the selected Rx to DR, placing it on the Designated Doctor’s review list on the Status Page.


If your Account has the functionality, the top of the Review Page displays drug-drug, drug-allergy and drug/condition interactions and additional alerts.  The   rx is checked against Current and Pending meds.  If the patient is an RxHub patient, drug interactions are automatically checked against a 120 day all-doctor history as well as Pending and Current Medications.Contraindicated appears in red and indicates a predictably severe consequence of concurrent use of two drugs. Severe appears in yellow and indicates action may be required to reduce the risk of adverse reaction. Moderate appears in yellow and generally indicates a need to adjust medications. Herbalinteractions are not characterized as to severity due to lack of standardized content and dosage.  Use the More Info link to see complete information on any potential interaction listed.


Allergy compares the rx to the patient allergies as entered on the Compose page are passed from an EMR. Detail is not available as it relates to the individual patient response.


The Drug/Condition  check is activated when the Diagnosis (ICD) or pregnancy (V code) is passed from the EMR or PM system. (Direct users: you can enter the Pt Dx via the Diagnosis tab on the Nav Bar).   Detail is not available as it relates to the individual patient response.


Pending Prescriptions from all workgroups in your account are displayed.  You may deselect a prescription to transmit it individually.  All selected prescriptions will be transmitted as a batch.


Clicking <Proceed to Print/Transmit> takes the current batch to the Routing Page where it will then be transmitted.  


If neither printing nor transm

itting is needed, (such as for a Schedule 2 drug) click <Finish/Add to Current Meds>.This adds the Rx to the patient’s Current Medications but does not allow any further transmission of the Rx. 


Doctors who choose to have their staff finish transmissions may click the <Approve/Leave for Staff> button.  This transfers the Rx to the doctor’s assigned nurse, marks the prescription with an NS status, and places it in the Staff Processing List on the Status Page for further processing.


If the user logged in is not a doctor and proceeds to the Review Page, the above described <Approve / Leave for Staff> button will be replaced with a <Leave for Doctor Review> button.  This transfers the prescription to a Doctor/Prescriber, marks it with a status of DR and places it in the Doctor Review List on the Status Page for further processing.


Clicking <Return/Additional Rx> returns you to the Compose Rx Page where you may add another prescription.


You may delete a prescription at this point in the process by clicking on the “X”. 


Note the select check boxes to the left of each pending Rx on the Review Page.  If left unchecked, no action will be taken on this Rx at this time.


Below the Rx on the page are <Print/Add to Current Meds> and <Transmit> buttons.  If you desire to skip the Route page you can use these buttons to add the prescriptions to Current Meds and print them locally or go directly to the Transmit page by clicking the <Transmit> button.


The Batch Concept

Note the check boxes to the left of the meds being processed.  On this and subsequent pages, un-checking a box splits the batch for separate processing.  For instance, a Schedule 2 drug must be printed, while the rest of the batch can be transmitted to the pharmacy.


The Routing Page


Summary

A batch of prescriptions ready for printing or transmission is displayed.  Note, only the Rxs for the Current Location are pre-selected.  Check or uncheck boxes in accordance with office policy prior to choosing <Print> or <Transmit>.   Specify the number of printed chart copies if desired.  (Transmitted prescriptions always have a single printable “receipt.”)  Check the box(s) for a printable patient leaflet as needed. (Select or change the patient language first.)    If you would like each Rx printed on a separate page, check the Print Singles box.   Click < Transmit> to send all selected Rx to the next page where a pharmacy can be selected and leaflets and copies printed. (A displayed pharmacy can be pre-selected here and will appear on the Transmit Page.)   The printed Rx should match your state format.  If not, contact This e-mail address is being protected from spambots. You need JavaScript enabled to view it. .   


The RX Support feature (not always present) provides printable information designed to encourage the patient to fill the Rx as written.  This information will print out with the Rx or Transmit receipt unless you uncheck the Rx Support box.


Upon arriving on the print page or upon transmission,  the Rx will have been added to the patient record, at the top of the Current Meds List.   If an error has occurred, go to the Compose Rx page and move the Rx to Previous Meds or Edit to modify an incorrect sig.  An explanatory note can be recorded in the Rx Detail. 


You will find yourself on the Route page after having clicked <Proceed to Print/Transmit> on the Review page.  All prescriptions will be displayed on the Route Page but only the Rx for the Current Location are pre-selected.  You may make changes by unchecking a box.  For example, if you want to print 2 prescriptions and transmit the other 3 you would uncheck/select the two you want to print. 


The first option on this page allows you to choose the number of chart copies of this prescription that you wish printed on paper. By clicking on the Number of copies drop down box, you may choose from 0 to 3 copies to print. The default setting is zero printed copies. If the prescription was transmitted electronically, you will have the option of reviewing a printable proof of transmission when you reach the Transmit Page. The copies on this page are in addition to the one printable from the Transmit Page.


If you want a Patient Leaflet to print, select a patient language.  If the patient’s language was entered on the Patient Details page that will be the default language that appears here.  If not, select the appropriate language and check the box(s)

for a printable patient leaflet as needed. These boxes appear to the right of each prescription, allowing you to select which leaflets to print if you do not want a leaflet printed for each prescription (This is a Comprehensive account option only). A record of the leaflet selection is added to the Rx Detail. If the requested language is not available, the leaflet will print in English.


Prescriptions will print up to 4 to a page or as required by your state. The Print as Singles option allows you to print each prescription on a separate page if you have multiple prescriptions being transmitted and you want each printed on a separate sheet of paper.


RxSupport

This feature (although not always present) provides printable information designed to encourage the patient to fill the rx as written.  These will print out with the Rx or Transmit receipt unless the box is unchecked.  If the Rx Support information is available for the medication being prescribed, the Rx Support box will be checked.  If the box is not checked, then there is no Rx Support information available.


Schedule 2’s

Note the Drug Schedule (Sch*) column to the right of the prescription selection boxes.  Schedule 2’s, such as Percodan, must be individually signed by the physician on state-mandated paper forms and cannot be transmitted.  ERx can support specialized printer set-up if needed.  Contact This e-mail address is being protected from spambots. You need JavaScript enabled to view it. to set up your state’s format.


How can you add Schedule 2 drugs to the patient record?  You can use the  <Finish/Add to Current Medications>option on the previous page (Review Page). Alternatively you can add them to the record from this Route Page, by clicking  <Print/Rx/Add to Current Meds>.  By not clicking on the Print Prescription link on the next (Print Rx ) page, you will not print the Rx on paper.  You can then handwrite the Schedule 2’s.


Pharmacy

If an Rx is a refill and was previously sent to a pharmacy, the pharmacy name, address & phone number will be displayed to the left of the prescription.   If the Rx has no pharmacy name in this box, you will choose a pharmacy on the Transmit Page.


Coming Soon:  A <Send> next to each pharmacy that will transmit the prescription immediately, bypassing the Transmit Page. No leaflet or receipt will be generated


Routing Prescriptions

You have two options on this page for routing prescriptions.   (1) For those prescriptions you do not wish to transmit electronically or via fax to the pharmacy, use the <PrintRx/Add to Current Meds> button.  Doing so automatically adds the selected prescriptions to the patient record and takes you to a print page where each prescription will be displayed along with any requested leaflets and additional copies. NOTE: In the event an error has occurred, the RX cannot simply be deleted at this point.  You need to go to the Compose Rx page and move the incorrect Rx to Previous Meds  -- OR -- use the Modify Sig feature (Edit) where you can record an explanatory note in the Detail Rx if desired.


If you want to print the prescriptions, leaflets and copies, click on the Print Prescription link that appears above the prescriptions to access your network printer.


If there are any remaining prescriptions for the patient, you will see a  Return to Routing link adjacent to the Print Prescription that will display the number of prescriptions remaining on the Route Page.  Clicking this link takes you back to the Route Page where you can continue processing the other prescriptions. 


(2) Your second option for routing prescriptions is to use the <Transmit RX> button.  Clicking this button will send all selected prescriptions to the next page where a pharmacy can be selected and leaflets and copies printed. 


The Transmit Page and Transmit Confirmation Page


Summary

Choosing the <Transmit RX> option on the Route page, takes you here with the selected prescriptions. 


You can send prescriptions as mail order by clicking on the mail order / home delivery link, verifying the shipping address and selecting the pharmacy. 


The patient’s previously selected pharmacies are at the top of the list, followed by an alphabetized location pharmacy list.  The patient’s available mail order pharmacies are denoted with a blue dot.  Add to the displayed pharmacy list from the link at the bottom of the page.  Report incorrect or missing pharmacies so we can correct the selection list.  After transmitting, use your network printer for the receipt and Patient Leaflet.  Note:  There is a slight delay with transmitting, so please make patients aware of this, especially if the pharmacy they are going to is within 5-10 minutes of your clinic.


The Pharmacy ID# located next to the DEA on a prescription is a unique identifier that may be requested by a pharmacist to confirm the source of the Rx.


The Transmit page is the last page in the prescribing process. You reached this page by selecting <Transmit RX> from the Route Page for electronic (or fax) processing. On the top of the page, the prescription(s) you have selected is listed. 


Each faxed prescription is accompanied by a message to the pharmacist, explaining the nature of the electronic Rx system along with the office contact information.


If a pharmacy name was pre-selected on the Routing Page, the pharmacy name and fax number will already appear.  If no pharmacy was pre-selected you must now choose one from the list.  The patient’s previously selected pharmacy is denoted at the top of the list with a black dot to the left of the pharmacy name. Those pharmacies without the black dot are also used by this patient but not as recently.


Mail Order

If you desire to send the prescriptions as mail order, there is a mail order/home delivery link on the transmit page directly beneath the prescriptions.  Clicking on

this link will open up the shipping/mailing address of the patient.  Verify the address by checking the box.  If the patient’s mailing address is not populated, fill in the information.  It will be saved in the patient detail for future mail order requests.  NOTE:  all prescriptions listed on the transmit page will be submitted as mail order prescriptions when the
mail order/home delivery link is clicked.


After verifying the patient’s mailing address, select the pharmacy as you normally would and click the <Transmit RX> button. 


Selecting a Pharmacy

A blue dot in the eRx column indicates that this patient utilizes an electronic mail order pharmacy. In this case, the Mailing address is displayed and is required for all mail order pharmacies.


A green dot under the eRx column indicates that this pharmacy is a participant in our electronic pharmacy network.  In other words, pharmacies listed with the green dot can accept prescriptions electronically.  If there is not a green dot in the eRx column then the prescription will be automatically faxed to the pharmacy.  All pharmacies listed can accept prescriptions by fax provided the fax number is listed or you input the fax number prior to transmission. 


However, there are a few instances when a participating pharmacy cannot accept a prescription electronically.


1) If there is a Schedule 2 or other non-compliant drug in the batch, or


 2) A doctor has not yet been approved by the network, or


3) A connection to the electronic network is not possible.


In either of these cases the pharmacy will require a fax. You must be sure that a fax number is provided. Verify that the correct fax number is listed for the chosen pharmacy.


If the fax number is incorrect or is not listed, enter the fax number in the field labeled Via Fax:  Corrected numbers are stored and displayed for future use.


If your pharmacy is not on the list, there is an Add a pharmacy to the list above link located at the bottom of the page that opens a Pharmacy Search box where you can search for the desired pharmacy by entering 1 or more fields.  Zip codes alone generally work well.  Once you have entered your search criteria, click <Search>.  The search results will display below.  Select the pharmacy by clicking on the pharmacy name.  This results in the selected pharmacy being added to the patient’s list of pharmacies as well as your Location/Workgroup’s list of pharmacies. 


If the pharmacy you are searching for is missing from the list, or if any displayed information is incorrect, please click on the missing/incorrect pharmacies: inform Support Services email link at the bottom of the page to inform us so that we may correct the database.  


Finally, when you have the correct pharmacy selected, click the <Transmit Rx/Add to Record> button, sending the Rx and adding the new information to the patient’s record. Once the prescription has been transmitted, these prescriptions can no longer be cancelled or modified.  If an error has occurred, go to the Compose Rx page and move the incorrect Rx to Previous Meds  -- OR -- use the Modify Sig feature (Edit) where you can record an explanatory note in the Detail Rx if desired.


Clicking the <Transmit Rx/Add to Record> button takes you to the Transmit Confirmation Page.  You will see a printable

220;receipt” of the completed transaction along with any additional selected copies or leaflets.  Use the Print link to access your network printer.  Note the adjacent
Return to Routing link that displays any remaining prescriptions for this patient on the Routing Page.


Note:  the Pharmacy ID # listed to the right of the DEA number is a unique identifier that may be requested by a pharmacist to confirm the source of the Rx. 


If there are no prescriptions left on the Route page, use the tabs on the Navigation Bar to select your next task.


Note:  There is a sight delay with transmitting, so please make patients aware of this, especially if the pharmacy they are going to is within 5-10 minutes of your clinic.


</SPAN

Pharmacy Communication Processing Pages:   (PharmCom)


Summary

The PharmCom pages process renewal requests submitted electronically by pharmacies, using a Federally-mandated sequence:   the pharmacy request cannot be modified.  Only # of refills can be changed.   If the pharmacy is not correct, you must deny the prescription.  Some or all of the following steps may not occur, depending on the amount of information sent by the pharmacy. 


On the PharmCom Patient Select Page, select from the displayed search results.  If the patient is not seen, correct the name or spelling and re-search if needed.  Select the patient before denying or the Rx will not appear in the patient’s record. Direct Users can add a new patient by clicking the click here to add a patient link.   Again, the Rx cannot be modified, so, if the sig, tablet size or dispense # has changed, use  <Deny and ReWrite> to generate a replacement Rx.  (All PharmCom transactions, including denials, are displayed in the Pharmacy Communications Log on the Admin Page as well as the patient’s Current Meds or, if denied, in the Cancelled Denied Log at the bottom of the Compose Rx page.    Scheduled drugs cannot be sent via Pharmcom so they will follow a different outgoing path. They cannot be sent electronically, but, in many states, can be faxed. Thus, when responding to the renewal, you will see the Route Page where you ca make your choice.  The sending pharmacy is displayed on the Transmit page. 


On the PharmCom Drug Selection Page, match the exact selected drug from the displayed choices.   Make your final decision on the PharmCom Review Page.    The sig, as sent by the pharmacy cannot be changed.  


You may use this page to process renewal requests and other messages submitted by pharmacies via the SureScripts and other electronic networks.  The number of pending pharmacy communications is displayed on the Status Bar at the top of all pages.  Click the bar to view the Status Page and the patient list.   Depending upon the amount of detail the pharmacy sends with the renewal request, there may be certain steps that can be omitted from this process such as the PharmCom Patient Select page and the PharmCom Drug Selection page.


Begin by selecting a patient under the Pharmacy Renewal Requests heading located on the Status Page. The Status Page can be reached by choosing the <Pharm:x Fax: x Pend: x> link at the top of each page.  Once you have selected a patient from the list you will be taken to the PharmCom Patient Select Page.  Select the correct patient from the displayed search results.


le="FONT-FAMILY: Arial"> </span></p> <p class="MsoNormal" style="margin-bottom: 0.0001pt; text-align: justify;"><span style="font-size: 12pt; font-family: Arial, sans-serif;">If the patient is not found, be sure the pharmacy has not misspelled or used a different name from what your account uses (i.e.  Larry vs. Lawrence).  Use date of birth to confirm identity.  Perform another search using fewer letters or last name only.  If, after trying all alternatives, you believe that the patient is truly not there</span></p> <p class="MsoNormal" style="margin-top: 0in; margin-right: 0in; margin-left: 0.5in; margin-bottom: 0.0001pt; text-align: justify;"><span style="font-size: 12pt; font-family: Arial, sans-serif;">Direct Users: , add the patient to your account by clicking the </span><span style="text-decoration: underline;"><span style="font-size: 12.0pt; font-family: 'Arial','sans-serif'; mso-fareast-font-family: 'Times New Roman'; color: blue;">click here to add a patient</span><span style="font-size: 12pt; font-family: Arial, sans-serif;"> link.  Once you have completed entering the necessary information to add the patient, return to process the pharmacy message. </span></p> <p class="MsoNormal" style="margin-top: 0in; margin-right: 0in; margin-left: 0.5in; margin-bottom: 0.0001pt; text-align: justify;"><span style="font-size: 12pt; font-family: Arial, sans-serif;">EMR users: return to add the patient there. </span></p> <p class="MsoNormal" style="margin-bottom: 0.0001pt; text-align: justify;"><span style="font-size: 12pt; font-family: Arial, sans-serif;"> </span></p> <p class="MsoNormal" style="margin-bottom: 0.0001pt; text-align: justify;"><span style="font-size: 12pt; font-family: Arial, sans-serif;">You may deny a prescription at this point. Use the drop down box to select a reason for the denial. If none of the reasons are applicable, you may type in your reason for denial in the box provided. Click <strong><Deny></strong>.  A notification of denial will be transmitted to the appropriate pharmacy, and you will be shown a confirmation to that effect. If a message is left in mid-sequence, it will be returned to the Status Page list for processing at a later time.  <strong>Scheduled drugs cannot be sent via Pharmcom so they will follow a different outgoing path. They cannot be sent electronically, but, in many states, can be faxed. </strong>Thus, when responding to the renewal, you will see the Route Page where you ca make your choice.  The sending pharmacy is displayed on the Transmit   <em>If a patient is not selected before denial, the record will appear only on the Pharmcom Log on the Admin Page.  </em><strong><span style="background: yellow; mso-highlight: yellow;">  </span></p> <p class="MsoNormal" style="margin-bottom: 0.0001pt; text-align: justify;"><span style="font-size: 12pt; font-family: Arial, sans-serif;"> </span></p> <p class="MsoNormal" style="margin-bottom: 0.0001pt; text-align: justify;"><span style="font-size: 12pt; font-family: Arial, sans-serif;">SureScripts and the participating pharmacies have required specific data standards that limit doctor choices:  the medication, dispense number, and sig cannot  be modified.  If any of the above are incorrect, the prescription must be Denied and, a new prescription must then be sent.  A message to that effect is one of the choices in the Deny drop-down reason’s list (denied, new prescription to follow).


All PharmCom transactions are recorded and displayed in the Pharmacy Communications Log which can be accessed from the Admin Page.  PharmCom transactions can also be viewed from the Compose Rx page by checking the Show Patient PharmCom Log box to view the accepted PharmCom transactions or by checking the Show Cancelled Medications box to view denied PharmCom transactions.  If desired, these can be highlighted and printed.


PharmCom Drug Selection Page


Upon patient selection, you will be on the PharmCom Drug Selection Page. The drug that is being requested by the pharmacy is highlighted in green.  A list of matching drugs is displayed below that area.  From the Search Results. match the exact drug by clicking on the requested drug, formulation or tablet size (i.e., Prozac 10 mg Cap). 


The sig as sent by the pharmacy is “text” that cannot be entered for dose checking or easy refills.  Therefore, it is recommended that you Edit the Rx to enter the sig as written by the pharmacy and delete the unneeded pharmacy text sig before accepting the prescription.  For example, the pharmacy request sig reads “take one capsule twice a day”.  You would edit the sig and (a) enter “1”, (b) confirm the type is “capsule”, (c) enter “BID, (d) delete the “take one capsule twice a day” text that is in the “additional sig” box, and (e) click <Save>.


RememberThe sig and dispense number from the pharmacy have already been entered and cannot be changed.  If you need to modify the medication, dispense number or sig, the prescription must be denied.  Thus, a message to that effect is listed as one of the choices in the Deny drop-down reason list (Denied, new prescription to follow). .    Scheduled drugs cannot be sent via Pharmcom so they will follow a different outgoing path. They cannot be sent electronically, but, in many states, can be faxed. Thus, when responding to the renewal, you will see the Route Page where you ca make your choice.  The sending pharmacy is displayed on the Transmit page. 


Once you have selected the correct “match” you will be taken to the PharmCom Review Page where you will make your final decision. 


PharmCom Review Page


After you have selected the appropriate drug and formulation, you are taken to the PharmCom Review Page.  Here you will see the patient’s pending prescriptions along with any allergies and drug interactions if your account has Comprehensive features.  The patient’s list of current medications is also displayed.  If there is a prescription pending that is a duplicate of the Pharmacy request you received, you can click on the “X” that is located to the far right of that pending prescription to remove it from the pending list and add it to the patient’s cancelled/denied list.  This helps avoid generating duplicate prescriptions.


Scheduled drugs will follow a different outgoing path.  They cannot be sent electronically, but, in many states, can be faxed.  Thus, when responding to the renewal, you will see the Route page where you can make your choice to transmit (via fax) or print.  If proceeding to transmit, the sending pharmacy is displayed on the Transmit page.


After doing so, confirm that the requested drug and the drug you selected match.  If not, use the <Return to Correct Errors> button to start over.  Otherwise, if applicable, enter the number of authorized refills and click <Accept>.  The medication has been added to the patient’s current medication list and a record of the request has been recorded in the Pharmacy Communications Log which is accessible from the Admin page or from the Compose Rx page by checking the Show Patient PharmCom box.


You will also note that the PharmCom Review page, like the PharmCom Compose page, provides you with the <Deny and Rewrite> option as well as the <Deny> option in the event you find yourself on this page and realize you are unable to accept the request as submitted by the pharmacy for this patient.  


Once you have replied to the request you will view a PharmCom Confirmation page.  From here, use the tabs on the Navigation Bar to take you to your next activity/task.

End of REFErncE MANULA


The Rx Detail Page


Summary

Accessed via the magnifier icon adjacent to each Rx, this page displays additional information regarding the Rx.  (Coming soon: as the Rx is being processed, Pre-Select Pharmacy allows instant sending of the Rx upon doctor approval or for later use by the nurse). The Email function will send a copy of the Rx as appropriate.  Rx Processing Notes allows attaching a message to the Rx and/or assigning it for review on the Status Page. Patient Education adds instructions that appear here and on the Patient Face Sheet.   After the Rx is final and on the Current Med list, the Rx Detail page changes: An Rx batch can be RePrinted/Transmitted, recording a duplicate transaction in the Print/Transmit Log Sig changes are tracked and displayed.  Pt.  Notes about the Rx, such as side effects can be recorded.


Note the Report Missing Rx section above the pharmacy transmission log.  If electronic “Success” is displayed, yet the pharmacy states they did not receive the Rx, please send us this information ASAP: it will be fully investigated.  For “missing” successfully faxed Rxs, contact the pharmacy directly and suggest they check their fax machine before requesting renewals.


Rx Detail displays the complete information about the Rx for your review.  This page displays different information before the prescription is transmitted (Pending Rx) and after transmission (Current Med).  In each case, you reach this page by clicking the magnifying glass icon on the prescription line.  To obtain specific information concerning the medication, click the Monograph or Leaflet  links located on the Rx Detail page.  


Viewing Detail Prior to Transmission (Pending Rx)

At the top of the Rx Detail page, the Sig information is presented. The Sig information is meant for review only. To change any Sig information listed on this page, return to the previous page and click on the Editlink. To obtain specific information concerning the medication, click on Monograph. To review the information that will print on the patient’s leaflet regarding this medication, click on Leaflet.


Select Pharmacy for Auto-send with Approval (coming soon) As the Rx is being processed, the user can pre-select the pharmacy for instant sending of the Rx upon doctor approval or for later use by the nurse.  Entering a pharmacy here allows the Doctor/Prescriber (or other authorized prescriber) to bypass having to select a pharmacy at authorization time thereby saving him/her some processing time.  The pharmacy selected here automatically receives this prescription once it is authorized and transmitted.


Viewing Detail of a Current Medication

Once the prescription has been reviewed and transmitted, it becomes part of the patient’s permanent file and is listed as a Current Medication on the Compose Rx page. If you click the magnifying glass

icon
on a Current Medication, you will see different features have been added to this screen. Below the Original Rx section the prescription is listed along with any other prescriptions that were transmitted or printed at the same time.


Emailed Copy of Rx allows notification to be emailed to the patient or any other authorized party, that this particular prescription has been transmitted to their selected pharmacy. 


Rx Processing Notes records information about the prescription. This information is not transmitted to the pharmacy, but is used for internal messaging/documentation only.

Any text written in the Patient Education box or chosen from the drop down box below will display on the Detail Page as well as the Patient Face Sheet.


At any time during the review of this page, clicking on <Close/Return to Prior Page> takes you back to your page of origin. Any changes will be saved only if the <Save/Send> button is clicked.


The Print Transmission Log is also displayed on the Detail Rx page.   If the prescription was transmitted electronically you will see the details of that transmission. A successful transmission will display the word “Success”. Occasionally a pharmacy will report that they did not receive an electronically transmitted prescription even though the log states “success”. If this occurs, please click the <Report Missing Rx> button immediately upon hearing from the pharmacy or patient. This will allow us to verify that the transmission was indeed complete. This feature is only to be used for prescriptions sent electronically. For “missing” successfully faxed Rxs, contact the pharmacy directly and suggest they check their fax machine before requesting renewals.


Clicking on the <Reprint/Transmit> button provides you the ability to retransmit or reprint the prescription. If the prescription was part of a batch you have the option of retransmitting or reprinting the entire batch or an individual prescription. Any retransmissions or reprinting will be documented in the Print/Transmit Log. You may use this feature when you need to resubmit a prescription or an entire batch of prescriptions.


Sig History displays a log of all sig changes made to this prescription. 

The authorizing doctor and user are both displayed. The sig changes will be listed on the patient record.


Patient Note Entry allows you to document any notes regarding the prescription such as side effects.  Remember to click the <Save Note> button after you have typed in your patient note.


Patient Education adds instructions that appear here and on the Patient Face Sheet. As with the Patient Note Entry, remember to click the <Save Note> button to retain any information you typed in this area.


At any time while viewing this Detail Rx page, you can click on Close/ Return to previous page to go back to your page of origin. Remember, changes will be saved only if the <Save Note > button is clicked prior to exiting the page.


</SPAN

Administrative Page Functions


The Admin Page lists a variety of functions designed to make your office run more efficiently that don’t necessarily fit directly into writing a prescription.  Come here to print reports or forms, build lists, add patients, and review our supporting materials.


Clinical staff can enter the Admin Page by selecting the <Admin> tab on the far right of the Navigation Bar.  Clerical/Admin staff come directly here. 


Select a task on the Admin Page and click on the Help link at the bottom of each page to learn more.   This entire reference manual can be viewed and printed from the Reference Manual link on the Admin Page. 


Add Patient is present if your account includes this function. Note that a search for duplicates is required prior to adding a new patient


Coming soon…


(1)   Medicare PartD-O-Lizer displays choices available to the patient and a summary of drug coverage.


Additional Features for Direct NewCrop Users Only


Many users of NewCrop Electronic Prescribing utilize the system via their practice management system or electronic medical record software.   Their patient information is loaded electronically, thus they have no need for the following features.  Contact This e-mail address is being protected from spambots. You need JavaScript enabled to view it. for additional information.


Add and Maintain Patient Page


New patients are added by accessing the Admin function on the Navigation Bar and then clicking the Add a new patient link located under the Patients section of the Admin page.  In order to avoid duplicate patients, a last name search is recommended first before adding a new patient.  Enter the last name and search to be sure the patient is not already entered.  If not found, then click on the click here to add a new patient link.  Fill in, at a minimum, the required fields marked with an asterisk (*).


Don’t forget Gender and Zip code.   These are needed to access RXHUB:  formulary, eligibility and patient Rx history.


The following data formats are used.   The medical record number should always be entered exactly in your format, including any dashes or other characters. 


type                                                     &

nbsp;                              Valid format

Dates                              Month/Day/Year  or MMDDYYYY Example: 3/20/2004, 03202004

Phone Number               (NNN) NNN-NNNN or NNN-NNN-NNNN or NNNNNNNNNN

Zip Code                         Five numbers

Zip4                                 Four numbers

SSN                                Nine numbers or NNN-NN-NNNN


To change information for a current patient, click the <Pt Details> tab on the Navigation Bar.  Make the desired changes and click <Save>. 


Note the check box labeled Current at the top of the page.  If unchecked, the patient will not appear for prescription writing.  Uncheck the box for those patients that have moved away, etc.  They can be made Current again at any time by coming back to the Pt. Details page and checking the box.


Scheduling:  coming soon


Pharmacy Communication Log

Summary

The Pharmacy Communication Log provides a record of all electronic communications with pharmacies via the Surescripts network.  Use your mouse to highlight and print reports if so desired.  (Note that an Rx denied without a patient appears only here).


This Log provides you a way to view a record of prescriptions that have been received from pharmacies electronically and then processed back  through to pharmacies. If a prescription is denied, particularly for an incorrect patient, a record of the transaction will only appear here.  (Approved prescriptions are added to the patient Current Medication List.)


Click the Pharmacy Communications Loglink from the Administrative Functions page to see the log of transactions.   To print: 1) Use the mouse to select the desired content.  2) Click <File> on the browser navigation bar and select <Print>.  3) Select a printer and click the “Selection” option in the Page Range Box.  4) Click the <Print> button.


Prescriber Report


Summary

Prescriber Report provides a printable log of all Rx authorized by a doctor.


This report generates a summary of all prescriptions authorized by a doctor:


1)   Select the desired doctor from the drop-down list for this location.

2)   Select a date range for the report by clicking on the calendar days. For a one-day report, click the same day on both calendars.

3)   For sequential reports, note the date of last report. Use this date to generate a new report using the ending date of the previous report as a start date.

4)   Click the Printer Friendly link and use browser buttons to print


Patient Details Page


Summary

The Patient Details page displays the selected patient’s general information, address, mailing address, contact information, insurance information, etc and allows updating in some configurations. An insurance plan must be entered for formulary coverage information to appear with drug selections.  Note the dropdown specifically for Medicare Part D.  On the left-hand side of the page below the patient’s name, the RxHub/RxHistory link may appear.  Click to view an all- doctor Rx history from the healthplan.


All users will access the Patient Details page from the Navigation Bar to enter any needed information.  You can come back to this page at any time to modify a patient’s information.


Note for Partner users:  You will see much of the information already filled in and “read-only.”  Some items such as patient language or pharmacy choice will still be changeable.


After a patient has been selected or added, you may enter patient-specific information here. Those users who have Formulary access may choose the patient’s Health plan from the drop down box located under the General Patient Information heading. Listed in this drop down box are all health plans which have been previously selected for your Account. If the patient’s health plan is not listed you may proceed to the Admin Page and select the Account Healthplan Listlink. Any health plan added to this list will be available for all users to access.


The Pharmacysection indicates the patient’s pharmacies. The PatientInformation section stores the patient demographics. Please note that all fields indicated with an asterisk (*) are required fields.


Insurance/Formulary information is not required for each patient.  However, if you wish to utilize the NewCrop Formulary feature, the health plan information must be entered on this screen. Choose from the drop-down list for your account.  Formularies are more specific than the insurance coverage.  Therefore, you may see multiple choices for each health plan.  For instance, Blue Cross may provide more than one formulary (i.e. PPO vs. HMO).  In addition, coverage may differ by employer.  You must closely inspect the list of alternative formularies to find the one matching your patient’s coverage as listed on their card or benefit information. If you can’t find a match, speak with your Account Manager.


This patient’s previously selected pharmacies and entered allergies are also displayed at the top of the page.


If you make any changes or additions to this page, be sure to click the <Save> button to record the updates.


DOQ-ITIT by request


DoctorR

17;s Office Quality-Information Technology is a new quality improvement program sponsored by Medicare.  It may evolve into “pay-for-performance.”   Go-live is scheduled for Fall of 2005. In the meantime, the account can monitor practice quality measures such as percent of coronary artery patients receiving aspirin.


Participation is optional for NewCrop accounts.  Your account manager can activate this feature.


Medicare PartD-O-Lizer


Summary

The Medicare PartD-O-Lizer displays choices available to the patient and a summary of drug coverage.

Coming very soon!!!!!


Medication Entry and Refill Page


Summary

The Medication Entry and Refill Page is used to 1) quickly record medications for new patients or those prescribed by doctors outside your account.  These medications are added to the patient record and can be selected for modification and re-use on the Compose Rx page.  2) add an Rx request to Pending Rx for further processing by doctor or clinical staff.


The Medication Entry and Refill Page may be accessed by clinical users via the link on the Compose Rx Page or the link on the Admin Functions page. This page allows staff not authorized to finalize prescriptions to still enter medication information into the patient record for reference or future processing.


For new patients, use this page to enter medications initially. You search for a drug the same as you would on the Compose Rx page however you will notice that, once selected, the checkbox to the left of the drug name is highlighted in blue and a  complete sig is not required.  Drug review does not occur when adding an Rx on this page, however the Drug Review can be used to perform this function after entry. Any doctor’s name can be entered as the prescriber and any start date can be entered.  Be sure to enter that information prior to searching for and selecting the drug.  The medications entered on this screen can later be selected on the Compose Rx Page for a refill or to change a sig and are included in drug interaction review.  Note: Be sure and select the drug first. Not doing so will cause the other information to be re-entered.


You are able to place an entered medication on the patient’s current medication list for viewing by the doctor.  To do this, select the checkbox to the left of the entered medication and click <Add to Current Medications> (Note, it will not have a ReWrite box because it cannot be renewed.)   Detail will not show either print or transmit information since neither has occurred.


If you do not add the medication to the patient’ current medication list, it will appear on the Compose Rx page as a pending medication.  You can enter the Detail Rx Page by clicking on the magnifying glass icon to add a message if needed, or to assign a DR or NS for the next step in processing of refills.  A compete sig is not required at this point.   Click <Save> and the Rx will display on the Pending list of the Compose Rx page.


In addition to adding medications, you may also enter Allergies from this page.


Patient Face Sheet


Summary

The Patient Version uses a non-medical sig and displays additional educational materials (from Rx Detail.)


The Patient Face Sheet feature provides a summary of the patient’s medications, allergies, diagnoses and demographics in a printable format. You may access this screen from the <Pt. Face Sheet> on the Compose Rx page. The patient’s medication list is also listed. This list replaces terms such as “tid” with “three times a day,” etc. for easier patient understanding.


To print this page choose <File>, <Print> and then select your desired ctions on the use of the work-flow and reporting functions of NewCrop Electronic Prescribing follow. This information also appears at the bottom of each page via the Help Screens.  A summary is included in “How to Write a Prescription.”  


Maintain Pharmacy List


Summary

Maintain Pharmacies shows each location’s list of selected pharmacies.  It can be built from here or allowed to accumulate as selected for each patient.  Rarely used pharmacies can be deleted.


Use this page to add pharmacies to the Location list, edit incorrect fax numbers, and delete seldom used pharmacies. You may reach this page by clicking on the link <to add a pharmacy click here> from theTransmit Page, or you may access this page from the Administrative Functionspage.


The Location pharmacy list is automatically generated as pharmacies are selected for patients on the Transmit Page. You may also choose to add pharmacies from the Admin Page at set-up, to provide a starting selection list. 


Search by for a new pharmacy by zip code, city, phone, name, or state.  (Add a state for common names such as Riverside.)  Note that a pharmacy name must be entered exactly.  If you are not sure of spelling, use part of the name and add a street, if known.


To edit or add a fax number, click on the desired pharmacy, change the number and then click <Save>.  To remove pharmacies, check the boxes on the left and click <Delete>.


Account Healthplan/Formulary List Page


Summary

Use the Account Healthplan List link to build and maintain your list of insurance and formularies. The list becomes a “pick-list” for each patient. 


This page allows selection of the insurance plan formulary used by your account’s patients.   If the account has the Medi-Media Formulary feature, coverage status for each drug will be displayed, specific to the patient’s insurance coverage.  To accomplish this, healthplans must be listed for the account and then assigned to each patient.


(If NewCrop is electronically linked with another application in the office such as practice management or patient record, healthplans may be selected there as part of the patient set-up process.)


Once selected, the account’s healthplans and associated formularies are displayed as a drop-down list for each patient on the Patient Detail pages.


Formularies

Formularies are more specific than the insurance coverage.  For instance, Blue Cross may provide a different formulary with each plan (i.e. PPO vrs.  HMO.)   In addition, coverage may differ by employer.  Therefore, you must closely inspect the list of alternative formularies to find the one matching your patient’s coverage as listed on their card or benefit information.   One bit of good news: preferred drugs will generally be the same across formularies for a given healthplan.  (Unfortunately, there is no formulary index system.  The group number may be of some help.  Be sure and enter this as part of patient demographics.)  Contact employer benefit managers for additional information.


Medicare formularies are now included:  Part D.  Handle these as you would an insurance plan formulary. 


Building Your Account’s Healthplan/Formulary List

To build your account list, start by clicking the add additional healthplanslink.  You will see all healthplans / formularies that include your state name.   Use the “Add” check boxes to the left of the healthplan / formulary name to select the ones you want and then click the <Add to List> button to start building your account list.  


Next, use the Search box to find additional choices.   Large employers may be listed nationally and do not appear by state: search the employer name.   There are also national healthplans and Medicare formularies that do not appear by state: search the plan’s name. 


Unable to Find a Healthplan?

If you cannot find the desired plan, try a different or shorter version of the name.   Contact customer This e-mail address is being protected from spambots. You need JavaScript enabled to view it. '; document.write(''); document.write(addy_text17477); document.write('<\/a>'); //-->\n This e-mail address is being protected from spambots. You need JavaScript enabled to view it.  with the missing plan.  Medimedia currently provides information for 3400 plans nationally and will endeavor to add any missing ones.


Patient Notes Page


The Patient Notespage provides a means of entering and storing patient information. To reach this page, select a patient on the Patient Select page and click <Pt Notes> on the Navigation Bar.


To write a note, type in any information you choose. There is no set format. Your name and date/time of entry are automatically added to the note.  


Each note is added to the Patient Notes list with the most recent appearing first.  No changes are possible once a note is <Saved>.  Correct any error by writing a second note.


Patient Diagnosis Page


The Patient Diagnosis page displays diagnoses and past medical history. To add a diagnosis to the patient’s Current Diagnosis List either select a diagnosis from the list displayed by clicking on the ICD9 code or enter at least the first three characters of the diagnosis and click <Search>.  If you know the ICD9 code, you may enter it into the search box. 


The search results will display below the search box.  Click on the appropriate ICD9 code to select it.  Doing so returns you to the Patient Diagnosis page with the selected ICD9 code and description entered in the appropriate boxes.  You may then move down to the Date of Onset field. This field is pre-populated with the current date. You click on the box and overwrite today’s date. If the exact date is not known or necessary, click on the Check box if exact date not known box.


In the Treating Physician box, the current doctor’s name can be overwritten by clicking in the box and overwriting it with the appropriate physician’s name.


NOTE: If the code you are searching for is not displayed, then you should change your search criteria and click <Search> again.


Once you have filled in the fields, click the <Save> button.  This will add the diagnosis to the patient’s list of current diagnoses.  If you have finished searching for the diagnoses, you can click the <Close List> button which will display the patient’s current diagnoses list and Previous Diagnosis List.


To move a current diagnosis to a prior diagnosis check the Move box associated with the chosen diagnosis and then click the <Move to Prior Dx> button.  You may choose to move more than one at a time by selecting more than one checkbox. 


Similarly, to move a previous diagnosis to the current diagnosis list, check the Move box associated with the chosen diagnosis and then click the <Move to Current Dx>.    You may choose to move more than one at a time by selecting more than one checkbox. 


In addition, you may type any Medical History for this patient in the Past Medical History text box by clicking in the  white box and typing any desired information.  Then click <Save Notes> to record the information.  Any information entered and saved here will be displayed on the Face Sheet or Patient’s Face Sheet which can be printed from the <Admin> page or from the Compose Rx page.


To print from the Admin page, click on the <Admin> tab.  Under the Patients section, click on the Face Sheet / Patient Face Sheet link which takes you to the Patient Face Sheet page. Your patient’s name will already be displayed.  From here you can select the Face Sheet or Patient Face Sheet checkbox depending upon which format you want to print.  Clicking the Printer Friendly link displays the Face Sheet in a new window.  Choose <Print> from the Windows File menu to send the sheet to your network printer.  Click on the <X> in the upper right hand corner of the new window to close the window and return to the Print Patient Face Sheet.


To return to the Patient Diagnosis page click <Patient Diagnosis> on the Navigation bar.  If you are done, click on any tab of the Navigation bar to go to another function or start another task.


Bottom of Form


First Medical Suite Electronic Medical Records The Best EMR Choice for any Medical Practice 9.5 First Medical Solutions offers an EMR that integrates the entire medical office. We provide an interface that is easy to use and simple to learn. No other EMR gives you the simplicity and the advanced features that is offered in First Medical Suite. http://www.firstmedicalsolutions.com 888-514-6337